Access the Comparison view
- In the sidebar, select the type of object to compare (for example, Traces or Models).
- Select the objects that you want to compare. The selection method varies depending on the type of object you are comparing:
- For Traces, select traces to compare by checking the checkboxes for the appropriate rows in the Trace column.
- For objects such as Models, navigate to the model Versions page and check the checkboxes next to the versions that you want to compare.
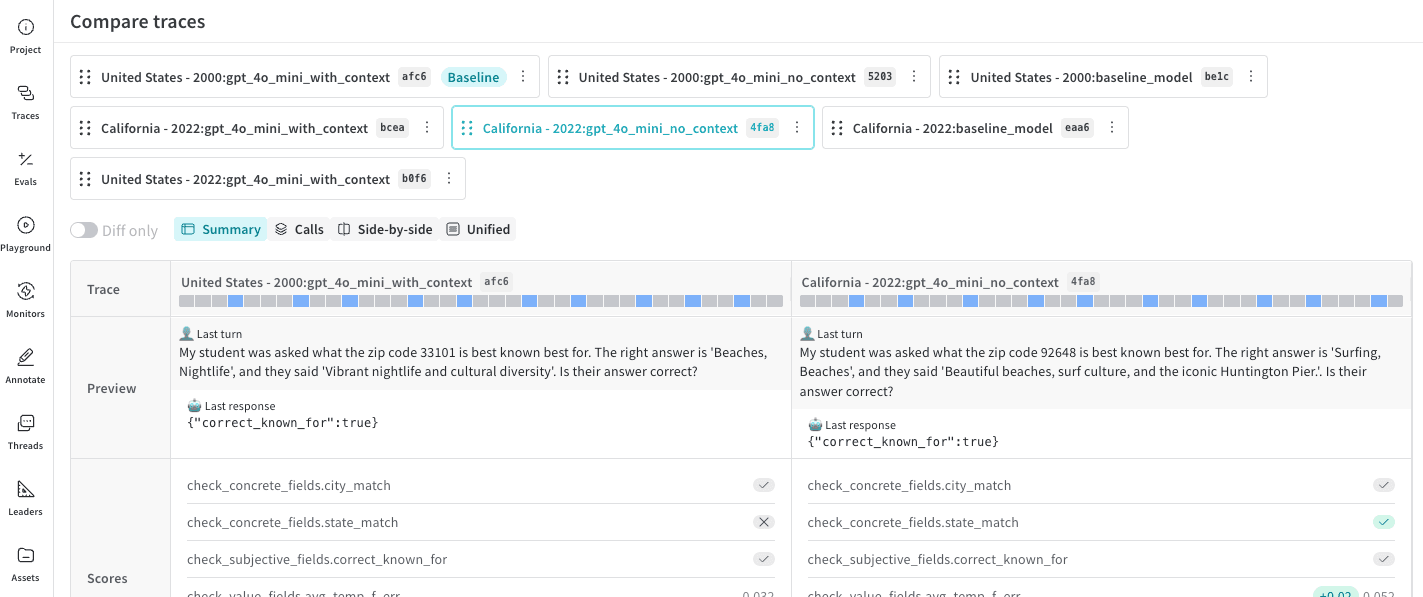
- Select Compare to open the Comparison view. At the top of the page, the comparison bar contains interactive call ID tokens (for example,
f02b,4a98) that you can drag, reorder, or remove to change the comparison. - You can refine your view using the available actions.
Customize the Comparison view
In the Comparison view, you can adjust how objects are displayed and compared:- Display summary
- Display a Calls view
- Change the diff display
- Display side-by-side
- Display in a unified view
- Set a baseline
- Remove a baseline
- Change the comparison order
- Change numeric diff display format
- Compare with baseline or previous
- Compare a pair from a multi-object comparison
- Remove an object from comparison
Display summary
The default view for a selected object comparison is a summary. This summary includes a preview of the LLM input and output, as well as tokens, cost, and latency.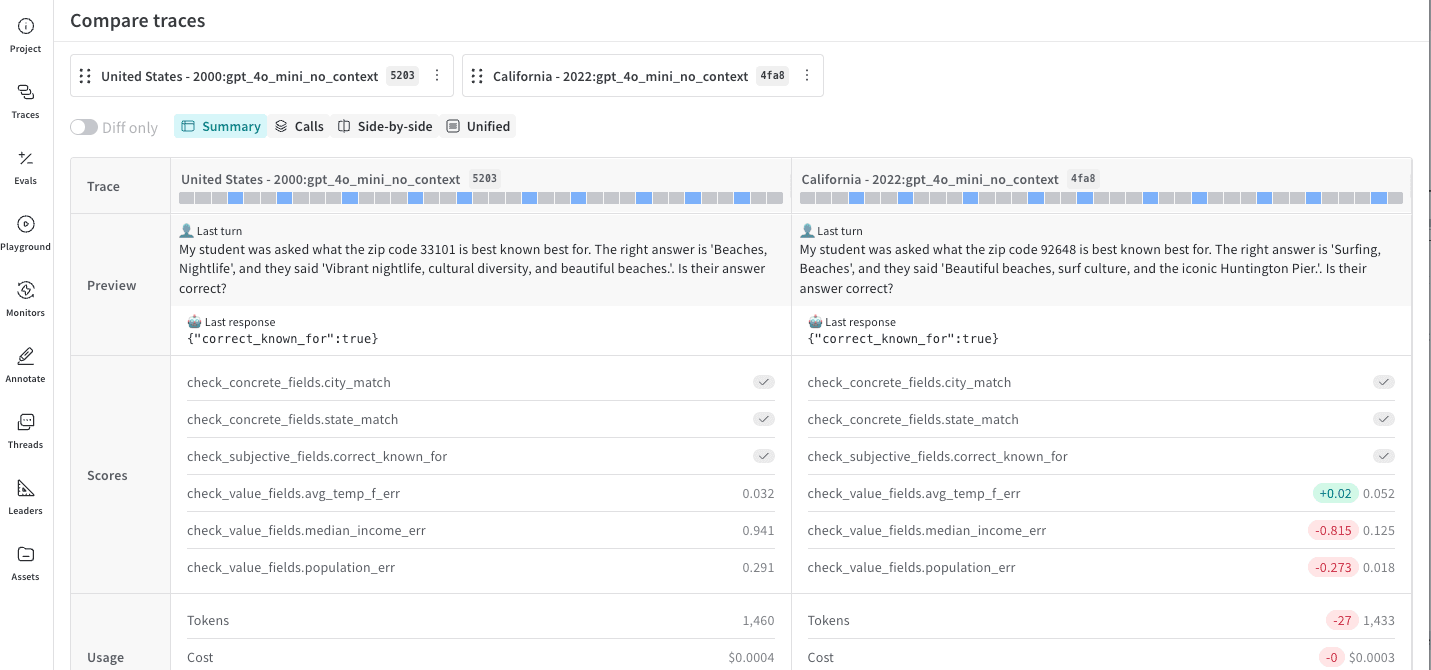
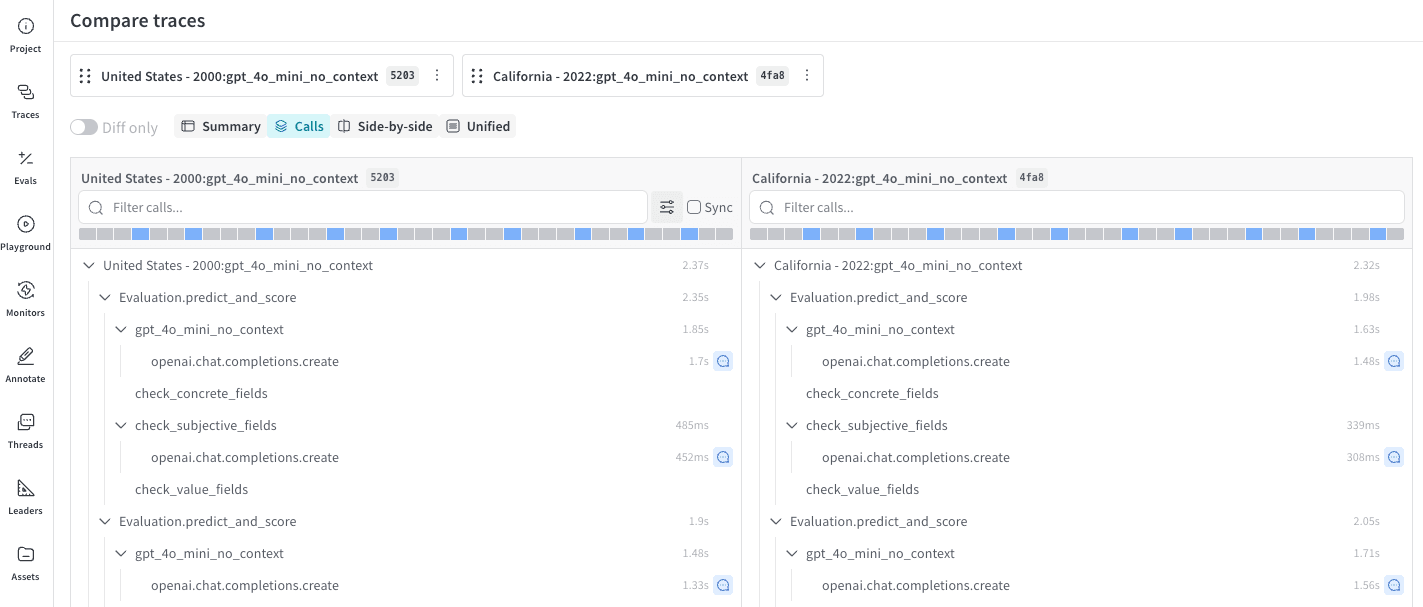
Display a Calls view
To compare each object’s Calls, select Calls. This view:- Displays the complete trace tree for the Call.
- Provides basic in-memory text search.
- Allows you to toggle the display of per-call latency, cost, tokens, Op kinds, and feedback.
Change the diff display
By default, Diff only is set to off. To filter the table rows so that only changed rows are displayed, toggle Diff only on. Diff only applies to side-by-side and unified views and is disabled in other views.Display side-by-side
To compare each object side-by-side in separate columns, select Side-by-side.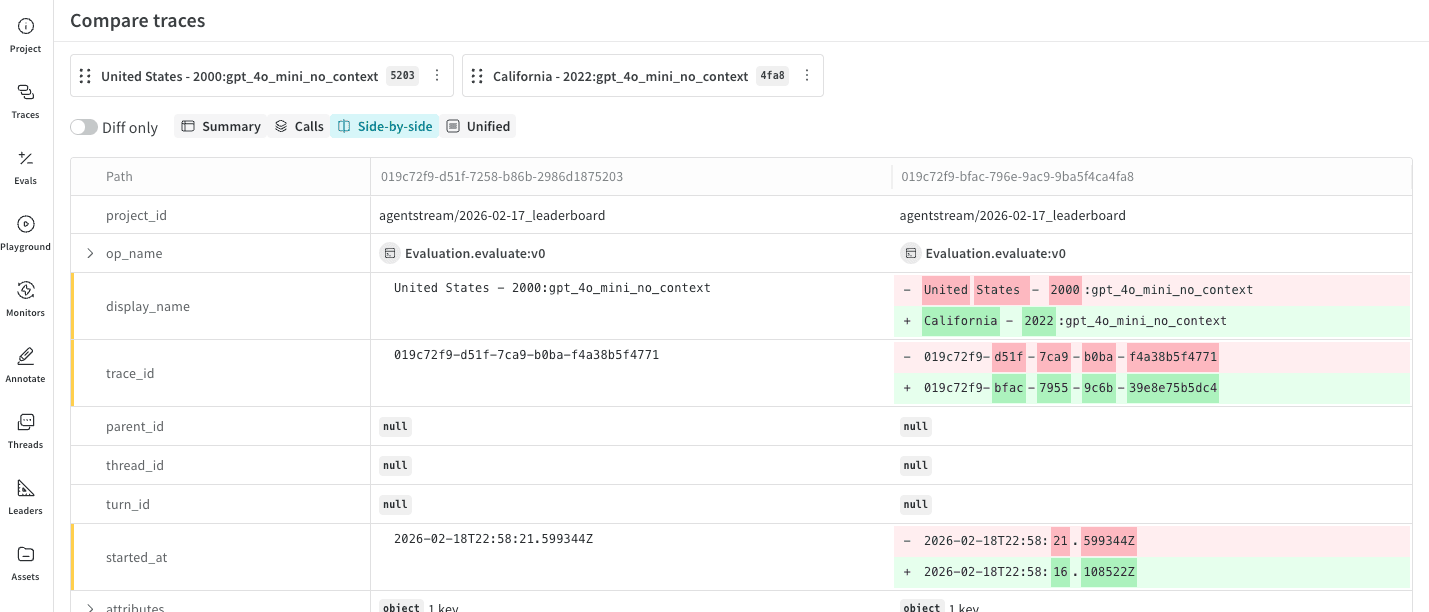
Display in a unified view
To compare two objects in a unified view, select Unified. This view is not available when comparing more than two objects.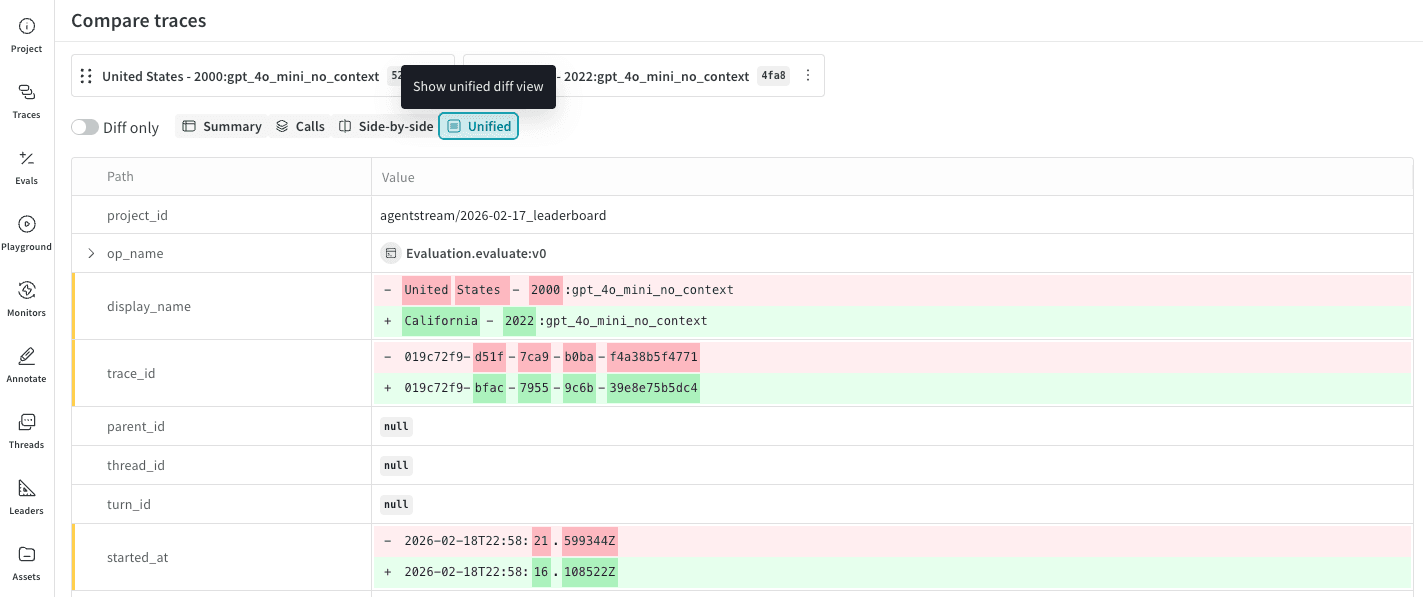
Set a baseline
By default, each object in the Comparison view is compared to the object to its left. However, you can set an object as the baseline, which means that all objects will be compared to the leftmost object in the view. To set an object as the baseline:- In the comparison bar, hold the pointer over the object that you want to set as the baseline.
- Click the ellipses () to the right of the ID.

- In the list, select Make baseline. The UI refreshes with the baseline object in the leftmost position in the comparison bar and
Baselinenext to the ID.
Remove a baseline
To remove an object as a baseline:- In the comparison bar, hold the pointer over the baseline object.
- Click the ellipses () to the right of the ID.
- In the list, select Remove baseline. Now,
Baselineno longer displays next to the call ID.
Change the comparison order
Drag the objects in the comparison bar to reorder them. This also reorders the corresponding columns in the comparison table. To change the comparison order:- In the comparison bar, hold the pointer over the ID that you want to reorder.
- Click and hold the six dots to the left of the ID and drag it to the left or the right as needed.
- Place the ID in the desired ordering. The comparison data refreshes with an updated comparison ordering.
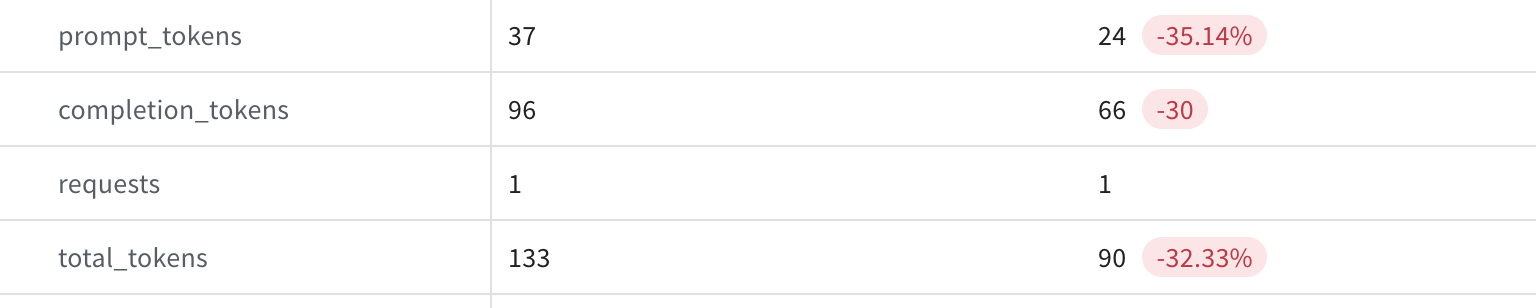
Change numeric diff display format
For numeric values such ascompletion_tokens and total_tokens, you can view the diff as either an integer or a percentage. Additionally, positive numeric values can be viewed as a multiplier.
To change a numeric diff’s display format:
- In the Comparison table, find the numeric value that you want to update the diff display format for.

- Click the diff value. The format automatically updates to either an integer or a percentage.
Compare with baseline or previous
This option is only available when comparing 3 or more objects. You can also set or remove an existing baseline by clicking the 3 dots to the right of the ID. To perform a baseline comparison with 3 or more objects:- In the right-hand corner of either the Side-by-side or Unified Comparison view, click the list. Depending on your current view configuration, the list is either titled Compare with previous or Compare with baseline.
- Depending on your current view configuration, select either Compare with previous or Compare with baseline.
- Compare with baseline: Sets the leftmost object as the baseline. The table updates so that the leftmost column is the baseline.
- Compare with previous: No object is set as baseline.
Compare a pair from a multi-object comparison
This option is only available when comparing 3 or more objects. When comparing 3 or more objects, you can compare a single object to its adjacent object or a baseline. This changes the Comparison table view so that the view is identical to a two-object comparison. To compare a pair of objects from a multi-object comparison:- In the comparison bar, select the ID you want to compare. If you have set a baseline, the view compares the selected object to the baseline. Otherwise, it compares the object to the ID immediately to its left in the comparison bar.
- To select the item, click the ID. The UI refreshes with a two-way comparison table.
Remove an object from comparison
This option is only available when comparing 3 or more objects. To remove an object from comparison:- In the comparison bar, find the object that you want to remove from comparison.
- Click the ellipses () to the right of the ID.
- In the list, select Remove object from comparison. The UI refreshes with an updated table that no longer includes the removed object.
Usage notes
- The Comparison feature is only available in the UI.
- You can compare as many objects as you’d like. However, the UI only displays a maximum of 6. To view an object in the comparison table that is not visible when comparing more than 6 objects, either change the comparison order so that the object is one of the first 6 objects from left to right, or pair from a multi-object comparison for easy viewing.